Showing posts with label Backtrack 5. Show all posts
on Friday, 26 April 2013

Hack Webcam


Our real purpose is to show just how easy it is, so you will take better awareness that it can be done, and  take security yourself.

Open Metasploit and run following commands:


msf>  show exploits


msf>use windows/browser/adobe_cooltype_sing

on Friday, 22 February 2013

Hacking a Computer using fastrack and backtrack

Hey friends i found a latest hack or way to hack into a computer which has a windows operating system.
Ok then lets start.Here are some requirments:-------->
1. Backtrack 
2. Ip address of victim.
3. Brain.
Now follow all the steps according to this post:--------------->
1. Open Fastrack by clicking on Applications-->Backtrack-->Exploitation tools-->Network exploitation tools-->Fast-Track-->fasttrack-interactive.
on Monday, 7 January 2013
Hey Friends i am back, sorry for posting late. Everyone wants to run google chrome in backtrack but it cannot be run in root user, but i have a way just follow all the steps:------>
1. Download google chrome from here.
2. After downloading chrome open directory file system/usr/bin and then find for google chrome and the open the file with gedit text editor.
on Monday, 19 November 2012

Install-Backtrack-from-usb-backtrack-logo


BackTrack is one of the best Linux distributions which is purely focused on penetration testing and is preloaded with several industry standard security and hacking tools like network analysers, wireless tools, fuzzers, crackers etc.. As like other Linux distributions BackTrack is also designed to boot and use from cd/dvd(called as live cd) but in some cases you may need to use BackTrack with your USB device. So in this post HPH will show you how to do it.
Even though BackTrack is designed to be used from live cd/dvd, it can also be used as a live USB drive. The process to make your live BackTrack USB drive is a piece of cake when you follow the 4 simple steps below.

Minimum Requirements:

  • USB device with 2+ GB space(4 GB is recommended)
  • BackTrack ISO file, If you don’t have the current latest version you can go
on Monday, 8 October 2012
Zenmap is the official Nmap Security Scanner GUI. It is a multi-platform (Linux, Windows, Mac OS X, BSD, etc.) free and open source application which aims to make Nmap easy for beginners to use .

To start Zenmap on Backtrack 5 KDE  : click on Dragon>Internet >click Zenmap (shown below )


Learn Nmap Scanning On Backtrack 5 Environment 

Nmap is a program that scans all of the ports in your computer and check it  whether they are open or not.

So lets start the scanning process in Backtrack 5 Environment .


Ping Scan 

WebSecurify 

Introduction 
  • Websecurify is an advanced testing solution built to quickly and accurately identify web application security issues.
Features


  • Available for all major operating systems (Windows, Mac OS, Linux) including mobile devices (iPhone, Android)
  • Simple to use user interface
  • Built-in internationalization support
  • Easily extensible with the help of add-ons and plugins
  • Moduler and reusable design based on the Weaponry Framework
  • Powerful manual testing tools and helper facilities
  • Powerful analytical and scanning technology

How to open Websecurify 


websecurify path


How to make new User in Backtrack 5 

new user in backtrack 5

To create  a new user in Backtrack or any other Linux based OS :

Syntax  :- useradd  <username>   //Here you have to write the username .
                        passwd  <username>   //Here you  allowing  password to the username .
    Enter a new UNIX password : <your password> //Password never shown to you.
    Re-type new UNIX password :<again type same password> //Re-confirm your password.
passwd: password updated successfully   // Message generated if password successfully submitted.

Example shown in the image is -
 useradd hackingDNA
passwd  hackingDNA
Enter a new UNIX password : 12345
Re-type new Unix password  : 12345
passwd : password updated successfully.

After creating a user id , Now time to login that account 
To login account , you have to enter a command : login
Then you have to enter you Username and password as shown below :

login

As you press  Enter Key , You successfully login your account from the Konsole as shown below :-

new user in linux

THIS IS HOW WE CAN CREATE A NEW USER IN BACKTRACK 5


THIS TUTORIAL IS JUST FOR EDUCATIONAL PURPOSE ONLY
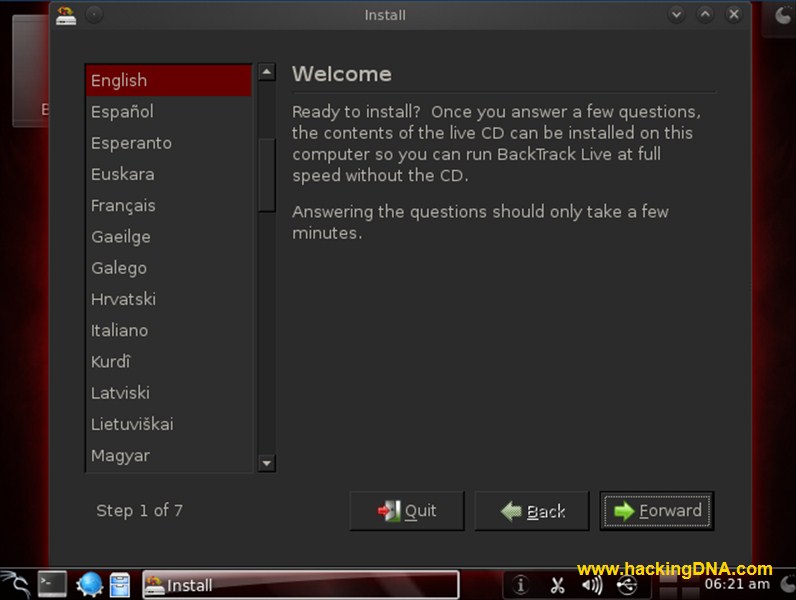
                              Lets start with first snapshot i.e Installing of Backtrack .

Step  1 :Click On Backtrack Icon.


Step 2 : Click On Forward Button

Step 3:Select your Time Zone and press Forward button.

Step 4: Keyboard Layout: Select your layout and press Forward Button.


Step 5 : Now here you have 2 options 
  • Erase and use the entire disk : If you use this option it will delete your entire disk and installed  Backtrack on your harddisk  .
  • Specify partitions manually (advanced) : If you opt this option then you have to create partition on harddisk . 
    Lets start from 1st Process :Erase and use the entire disk


    Step 6 : Click on Install Button : In this process  no need to creating any partition on harddisk system will automatically created partition .

    Second Option : Specify partitions manually (advanced)


    Prepare Partitions : Select /dev/sda and click new partition . When new partition created it will look like below image -


    Now new partition created now create a Linux Partitions i.e 
    /  Partition (also called root ) : It is a partition where all Linux files are stored .
    /boot  Partition : All the Linux Booting files are stored on Boot .
    swap  Partition : It is a Virtual Memory .
    Note :  Always remember that two main files are responsible for booting -

    1. GRUB(Grand Unified Boot Loader)
    2. LILO (Linux Loader)

    First : create root partition and put Mount Point as / (root) and press OK

    Your root created now .
     Applying same step to create /boot partition -

    Select partition as : Logical
    Partition Size :1000
    Mount Point : /boot

    Press OK


    After creating /boot partition it will look like this image .

    Now create a Swap Partition

    The only change we have to do is in Size  and Mount Point 
    Size : Give double the size of RAM 
    Example : if i have 512 Ram then assigned 1024 mb of size.
    Use as : Swap Area

    Swap area is created . Now press Forward button


    Press Install and start installation.

    Installation process running in middle of the process shows this windows shown below -


    Installation Process : In the middle  of installation you see this type of process going on .


    Installtion Completed 
    Restarted Now


    Your Installation Completed
    Now start Exploiting

    on Saturday, 8 September 2012

    BackTrack is a Linux distribution that is based on Ubuntu, designed for hackers and/or security professionals, and loaded with the best Free Software and Open Source penetration testing applications available.
    The latest edition is BackTrack 5 R2 (the “R” is for Revolution), and the most recent article about it published on this website, before the publication of this one, is Install BackTrack 5 Revolution 2 on external hard drive.
    In this article, the steps required to dual-boot the KDE edition with Windows 7 (there is also a GNOME edition), are presented. To begin, download an installation image from here. Burn it to a DVD, then place the DVD in your computer’s optical drive and reboot. The system will boot into a console and you will see a prompt just like the one in the image below. To boot into a Live KDE desktop, type startx and press the Enter key on your keyboard.
    BackTrack 5 R2 Startx
    Once in the Live desktop, click on the Install BackTrack icon on the desktop. And when the installer launches, click through the first few steps until you get to the one shown below, It is the fourth of eight steps of the installation process. Notice that you have four disk partitioning options. How you want to set up the dual-boot system will determine which one you select.
    Since the objective is to set up a dual-boot system, you obviously do not want to choose the second option (Erase and use entire disk). Select the first option if all the space on the disk is taken up by Windows and you want the installer to shrink Windows and install BackTrack. Select option 3 (Use the largest continuous free space) only if there is unpartitioned space on the target disk and you want the installer to auto-partition the space. Use the fourth option (Specify partitions manually (advanced)) if you want to create a custom set of partitions. This assumes that you have some knowledge of disk partitioning in Linux. If you do not, and want to go this route, you might want to read guide to disks and disk partitions in Linux and tips for dual-booting Windows and Linux.
    Just to show how this can be done manually, the last option is selected for this tutorial.
    BackTrack 5 R2 Disk Partitioning Options
    And it just so happens that the target disk has some unpartitioned space. So the next step is to select it and click the Addbutton. By default, the BackTrack 5 installer creates just two partitions – one for the root partition, and the other for Swap. For a distribution of this sort, that is likely all you need, unless you want to add an NTFS partition at the end for whatever reason you can think of. For this tutorial, just two partitions will be created.
    BackTrack 5 R2 Advanced Partitioning Tool
    This is the partition setup window. Since there are two existing partitions (the Windows 7 partitions), the installer will attempt to create the BackTrack partitions as logical partitions, which is just fine. BackTrack, like any Linux distribution, can boot from a logical or primary partition. If you are confused about “primary” and “logical,” take a few minutes to read guide to disks and disk partitions in Linux.
    What you need to do at this step, is specify the amount of disk space you want to use for BackTrack 5, then select the file system from the “Use as” dropdown menu (the default is ext4). Finally, select the mount point from the “Mount point” dropdown menu.
    BackTrack 5 R2 Create Partition
    This is what the same step looks like after the right values have been specified. Click OK to return to the main window.
    BackTrack 5 R2 Create Root Partition
    For the next partition, which should be for Swap, select “swap area” from the “Use as” menu and specify the amount of disk space you want. OK.
    BackTrack 5 R2 Create Swap Partition
    Back to the main window, click Forward to move to the next step.
    BackTrack 5 R2 Create Partition Cmpleted
    On the next step, shown here, the installer gives a summary of what it will do, based on the selections you made. And this is also where you specify where you want the installer to install GRUB, the boot loader. By default, GRUB, the GRandUnified Bootloader, is installed in the Master Boot Record (MBR). In setting up a dual-boot system with Windows, installing it there will overwrite the Windows boot loader, which could cause major headaches for you when you reinstall or upgrade Windows, or install certain anti-virus programs. The recommended option is to install GRUB in the root partition of BackTrack, which in this case, is /dev/sda5. So, to change where GRUB should be installed, click Advanced.
    BackTrack 5 R2 Install Summary
    That should land you here. You can see that /dev/sda is the “Device for boot loader installation.” That is just another way of saying that GRUB will be installed in the MBR.
    BackTrack 5 R2 Install GRUB MBR
    For this tutorial, you want to change it to /dev/sda5OK.
    BackTrack 5 R2 Install GRUB Root Partition
    Back to the installer summary window, click Install to continue with the rest of the installation.
    BackTrack 5 R2 Install
    After installation has completed successfully, reboot the computer. It will boot into Windows, which is expected. The next task is to add an entry for BackTrack 5 to Windows 7′s boot menu. To do that, you need another application. The easiest to use that I have found is a free-for-personal-use software from NeoSmart Technologies called EasyBCD. You may download it from here. After download, install it in the same way that you would install any other Windows application.
    After installation, launch it. EasyBCD’s main window is shown below. To add an entry for BackTrack 5, click Add New Entry.
    Windows Boot Menu EasyBCD
    Now, you are here. Click on the Linux/BSD tab. Select GRUB 2 from the “Type” dropdown menu, then modify the “Name” field to reflect the name of the distribution. Click on the Add Entry button, then on the Edit Boot Menu tab to see the result. GRUB 2 is the version of GRUB used by BackTrack 5.
    BackTrack 5 R2 Add Windows Boot Menu EasyBCD
    This is what the result should be. Exit EasyBCD, then restart the computer.
    BackTrack 5 R2 Windows Boot Menu EasyBCD
    You should now see a boot menu that looks just like this one. Boot into both operating systems one after the other to verify that everything is alright. Happy hacking.
    Windows 7 Dual-Boot BackTrack 5 Boot Menu